Tutorial to make gradient background is an interesting tutorial. In this tutorial we will learn to create a gradient background, but homemade ...
Without the length and width and not use old (GPL) let's make a gradient!
1. Run the program Photoshop.How: Start -> All Programs -> Adobe Photoshop
2. Create a new WorksheetHow: press [Ctrl] + [N]You can make your own arrangements, butHere I set it like this:Name = gradientSazes preset = 800 x 600Width = 800Height = 600Resolution = 72 pixels / inchMode = RGB ColorContents = Transparent (* recommended)Press [ok]
3. After that click on the Gradient Tool with the image icon on the left tool box
Gradients Tool
4. On the upper screen there are the properties of the gradient
Left click on the section that I gave lingkakaran dialog box that appearsGradient Editor
This is the normal setting on my computer
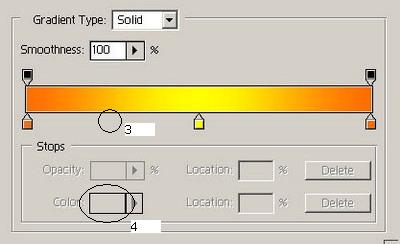
5. Now is the time to edit the gradient is desired, as an example I will create a gradient"Red - black - red - black - red"Here's how:Change Name = red - black - red - black - redGradients Type = SolidSmoothness = 100% Click the circle with no. AThen the circle and select the color red no.2 [OK]
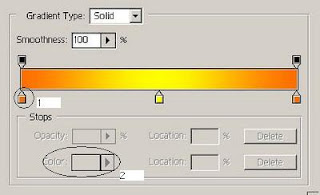
Further
Just like the previous stepbut this time at no. 4 black color you select [OK]
Further
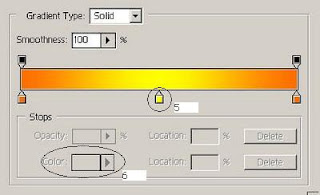
Yup still the same but this time at no. 6 select the color red
Further
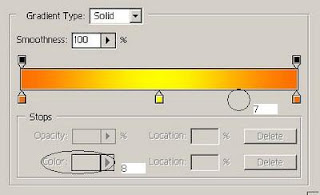
Equally, no color change. 8 to be black
Further
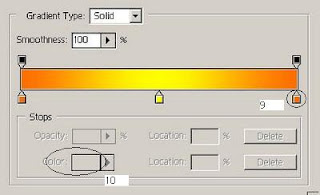
Equally, no color change. 10 into the red
The result:
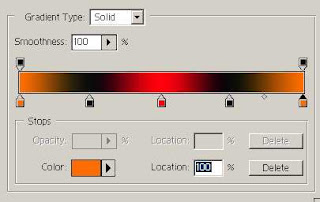
After that, click the New button on the Gradient Editor dialog isAnd So ........You can develop yourself according to your creativity
A little extra
Try with gradian mode that you createdThere are 5 kind of gradient mode:
a. Linear GradientGradient in the direction of the straight lineOn Worksheet hold left click then brush from left to right, the result:

b. Radial GradientsGradient as if emerging from the center of a circlethe result:
c. Angle GradientGradient with a certain angle but still centered on the coreThe result:
d. Reflected GradientJust as linear but with a reverse effect

e. Diamond GradientGradient with effect rhombus / diamondThe result:
Purpose:By mastering the gradient technique will make your design more attractive and real
GOOD USEFUL
Creating Images With the Pen Tool
Tutorial make a drawing with the Pen Tool is a basic tutorial that must be mastered. Drawing is a fun hobby, this time we will draw using the pen tool function ...
this is very useful for designing
Here's how:
On Tool Box seek
The following Examples make up with the Pen Tool
Make up the triangle with the pen tool
Click Three Points to form a triangle
last
It will automatically form a triangle
Create Picture of Fish
Now it's time to fish, live dikreasikan trick only:
Here is a picture of homemade fish writer, you can create a smoother and better, this is only as guidelines or examples
I'm using 23 point
Just follow the point 1 to 23 and then back to point 1 again
and ...
The result
Piranha fish in the well screen
tips:
Hold down the [Shift] to make a straight line
Use the Ellipse tool to add eye
The result:
... Wow, Fish Lohan! Fried or baked good together ...!!!
this is very useful for designing
Here's how:
On Tool Box seek
pen tool icon
The following Examples make up with the Pen Tool
Make up the triangle with the pen tool
Click Three Points to form a triangle
last
It will automatically form a triangle
Create Picture of Fish
Now it's time to fish, live dikreasikan trick only:
Here is a picture of homemade fish writer, you can create a smoother and better, this is only as guidelines or examples
I'm using 23 point
Just follow the point 1 to 23 and then back to point 1 again
and ...
The result
Piranha fish in the well screen
tips:
Hold down the [Shift] to make a straight line
Use the Ellipse tool to add eye
The result:
... Wow, Fish Lohan! Fried or baked good together ...!!!
Know the Custom Shape Tool
This time we will know and master the Custom Shape Tool. On the program Adobe Photoshop you are spoiled by the presence of a template - a template that can be directly we use, one of which is the custom shape tool ...
Custom Shape Tool as well as AutoShape in Microsoft World, but unfortunately given template selection is not as much on the Microsoft World.
Here's how:
Location of Custom Shape Tool
to choose the left-click
After that go into the properties of the custom shape tool located under the main menu
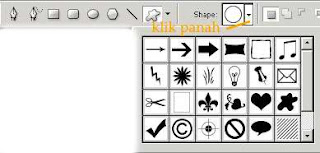
Left-click to bring up the template so that the arrows show the option
To set the color from the Custom Shape Tool through the properties you can set up the color
- After pass up all the settings above then just use to the canvas by holding the left click
For example I use a tone image
create an image of the strains muzik tones
Examples of tone Shape Tool
You can be your own creation by imagination, and good luck ...
The $_POST Variable
The predefined $_POST variable is used to collect values from a form sent with method="post".
Information sent from a form with the POST method is invisible to others and has no limits on the amount of information to send.
Note: However, there is an 8 Mb max size for the POST method, by default (can be changed by setting the post_max_size in the php.ini file).
Example
|
When the user clicks the "Submit" button, the URL will look like this:
http://www.yourdomain.com/welcome.php |
The "welcome.php" file can now use the $_POST variable to collect form data (the names of the form fields will automatically be the keys in the $_POST array):
Welcome ! You are years old. |
When to use method="post"?
Information sent from a form with the POST method is invisible to others and has no limits on the amount of information to send.
However, because the variables are not displayed in the URL, it is not possible to bookmark the page.
The PHP $_REQUEST Variable
The predefined $_REQUEST variable contains the contents of both $_GET, $_POST, and $_COOKIE.
The $_REQUEST variable can be used to collect form data sent with both the GET and POST methods.
Example
Welcome ! You are years old. |
The $_GET Variable
The predefined $_GET variable is used to collect values in a form with method="get"
Information sent from a form with the GET method is visible to everyone (it will be displayed in the browser's address bar) and has limits on the amount of information to send.
Example
|
When the user clicks the "Submit" button, the URL sent to the server could look something like this:
|
The "welcome.php" file can now use the $_GET variable to collect form data (the names of the form fields will automatically be the keys in the $_GET array):
Welcome . You are years old! |
When to use method="get"?
When using method="get" in HTML forms, all variable names and values are displayed in the URL.
Note: This method should not be used when sending passwords or other sensitive information!
However, because the variables are displayed in the URL, it is possible to bookmark the page. This can be useful in some cases.
Note: The get method is not suitable for very large variable values. It should not be used with values exceeding 2000 characters.
PHP Form Handling
The most important thing to notice when dealing with HTML forms and PHP is that any form element in an HTML page will automatically be available to your PHP scripts.
Example
The example below contains an HTML form with two input fields and a submit button:
|
When a user fills out the form above and click on the submit button, the form data is sent to a PHP file, called "welcome.php":
"welcome.php" looks like this:
Welcome ! You are years old. |
Output could be something like this:
Welcome John! You are 28 years old. |
The PHP $_GET and $_POST variables will be explained in the next chapters.
Form Validation
User input should be validated on the browser whenever possible (by client scripts). Browser validation is faster and reduces the server load.
You should consider server validation if the user input will be inserted into a database. A good way to validate a form on the server is to post the form to itself, instead of jumping to a different page. The user will then get the error messages on the same page as the form. This makes it easier to discover the error.
Subscribe to:
Posts (Atom)